Step-by-Step Guide: Sending Events via the Lunary API
If you'd like to report data from a platform not supported by our SDKs, this page is for you.
Getting Started
The endpoint for sending events to the Lunary Cloud API is:
https://api.lunary.ai/v1/runs/ingest
You can find the full API documentation here.
You will need your project's Public Key to authenticate requests (pass this as the Bearer token in the Authorization header).
Step 1: Sending LLM data
Start Event
At a minimum, you will need an ID, the model name, and the input data to send a start event.
While the ID can be any unique identifier, we recommend using a random UUID.
Using curl, here's an example:
curl -X POST "https://api.lunary.ai/v1/runs/ingest" \-H "Content-Type: application/json" \-H "Authorization: Bearer PUBLIC KEY" \-d '{"events": [{"type": "llm","event": "start","runId": "replace-with-unique-id","name": "gpt-4o","timestamp": "2022-01-01T00:00:00Z","input": [{"role": "user", "text": "Hello world!"}]}]}'
End Event
Once your LLM call succeeds, you need to send an end event with the output data. Here’s an example:
curl -X POST "https://api.lunary.ai/v1/runs/ingest" \-H "Content-Type: application/json" \-H "Authorization: Bearer PUBLIC KEY" \-d '{"events": [{"type": "llm","event": "end","runId": "some-unique-id","name": "gpt-4o","timestamp": "2022-01-01T00:00:10Z","output": [{"role": "assistant", "text": "Hello. How are you?"}],"tags": ["tag1"]}]}'
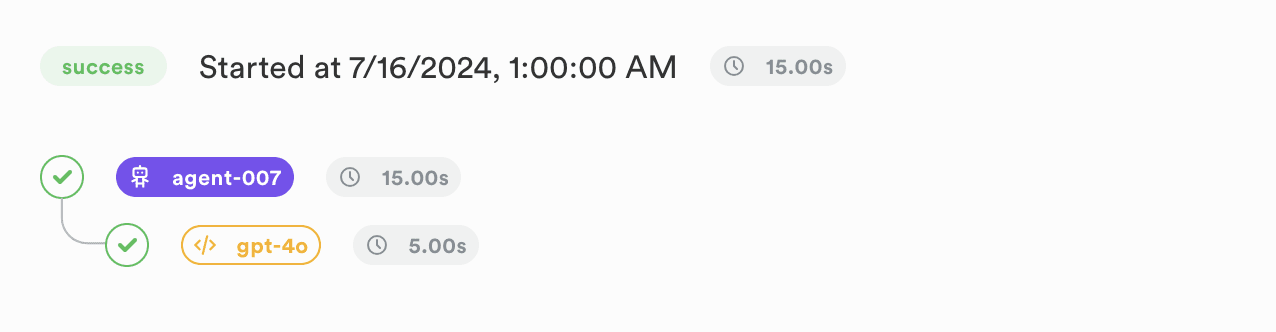
You should now see a completed run in the Lunary UI:

Additional Data
You can report additional LLM data in the extra object, such as temperature, max_tokens, and tools. Similarly, arbitrary metadata can be passed in the metadata object, user information can be reported in the userId and userProps fields, and tags can be added to the event.
Example with additional data:
curl -X POST "https://api.lunary.ai/v1/runs/ingest" \-H "Content-Type: application/json" \-H "Authorization: Bearer PUBLIC KEY" \-d '{"events": [{"type": "llm","event": "start","runId": "some-unique-id","name": "gpt-4o","timestamp": "2022-01-01T00:00:00Z","input": [{"role": "user", "content": "Hello!"}],"userId": "some-internal-id","tokensUsage": {"completion": 100,"prompt": 50},"userProps": {"name": "Jane Doe","email": "jane@example.org"},"extra": {"temperature": 0.5,"max_tokens": 1000,"tools": []},"metadata": {"organizationId": "org-123",},"tags": ["tag1"]}]}'
You can also add a templateVersionId field to reference the template version used in the call.
Reporting errors
If an error occurs during the LLM call, you can report it in the error field using an error event.
curl -X POST "https://api.lunary.ai/v1/runs/ingest" \-H "Content-Type: application/json" \-H "Authorization: Bearer PUBLIC KEY" \-d '{"events": [{"type": "llm","event": "error","runId": "some-unique-id","timestamp": "2022-01-01T00:00:00Z","error": {"message": "Model failed to generate response","stack": "Error: Model failed to generate response\n at ...",}}]}'
Attaching feedback
If you have feedback from the user, you can attach it to the event using the feedback field and a feedback event.
curl -X POST "https://api.lunary.ai/v1/runs/ingest" \-H "Content-Type: application/json" \-H "Authorization: Bearer PUBLIC KEY" \-d '{"events": [{"event": "feedback","runId": "some-unique-id","feedback": {"comment": "Great response!","thumb": "up"},"overwrite": false}]}'
Note that feedback might take up to 1 minute to be reflected in the UI.
Step 2: Basic Traces
If you have multiple LLM calls in a single action, you can use the parentRunId field to link them together, under an "agent" run.
curl -X POST "https://api.lunary.ai/v1/runs/ingest" \-H "Content-Type: application/json" \-H "Authorization: Bearer PUBLIC KEY" \-d '{"events": [{"type": "agent","event": "start","runId": "agent-run-id","name": "agent-007","input": "Hello world!","timestamp": "2024-07-16T00:00:00Z"},{"type": "llm","event": "start","runId": "llm-run-id","parentRunId": "agent-run-id","name": "gpt-4o","timestamp": "2024-07-16T00:00:05Z","input": [{"role": "user", "content": "The user had a question: Hello world!"}]},{"type": "llm","event": "end","runId": "llm-run-id","parentRunId": "agent-run-id","name": "gpt-4o","timestamp": "2024-07-16T00:00:10Z","output": [{"role": "assistant", "content": "Hello. How are you?"}]},{"type": "agent","event": "end","runId": "agent-run-id","name": "agent-007","output": "Hello. How are you?","timestamp": "2024-07-16T00:00:15Z"}]}'
Now, if you head to the Traces section in the Lunary UI, you should see the new trace, with the agent and LLM runs nested together:
Similarly, you can nest multiple levels of agents together, and report other run types such as tool and embed.
Step 3: Advanced Traces (with tools and threads)
A typical user/agent flow might look like this:
- The user asks a question.
- Your system invokes an agent to handle the request.
- The agent makes an LLM call and asks a tool to be executed.
- The tool is executed.
- Another LLM call is made with the tool's output.
- The final answer is returned to the user.
Steps 2-5 could repeat multiple times.
Here's what that would look like in terms of events:
1. The user asks a question
Capture the user message using a thread.chat event and the message field.
Note that we must pass a parentRunId here, which is the unique identifier of the current thread. Thread runs are opened and closed automatically, you don't need to explicitly start or end them.
For a chat event, a different parentRunId means a different conversation thread with the user.
{"type": "thread","event": "chat","runId": "chat-run-id","parentRunId": "thread-run-id","timestamp": "2024-07-16T00:00:00Z","message": {"role": "user", "content": "What's the weather in Boston?"}}
2. Invoke an Agent to handle the request.
While this is optional (as we already have a parent chat run), it's good practice to open an agent run to encapsulate the agent's logic.
This also allows us to see the isolated's agent execution in the Traces tab of the Lunary UI.
{"type": "agent","event": "start","runId": "agent-run-id","parentRunId": "chat-run-id","name": "my-super-agent","timestamp": "2024-07-16T00:00:01Z","input": "What's the weather in Boston?"}
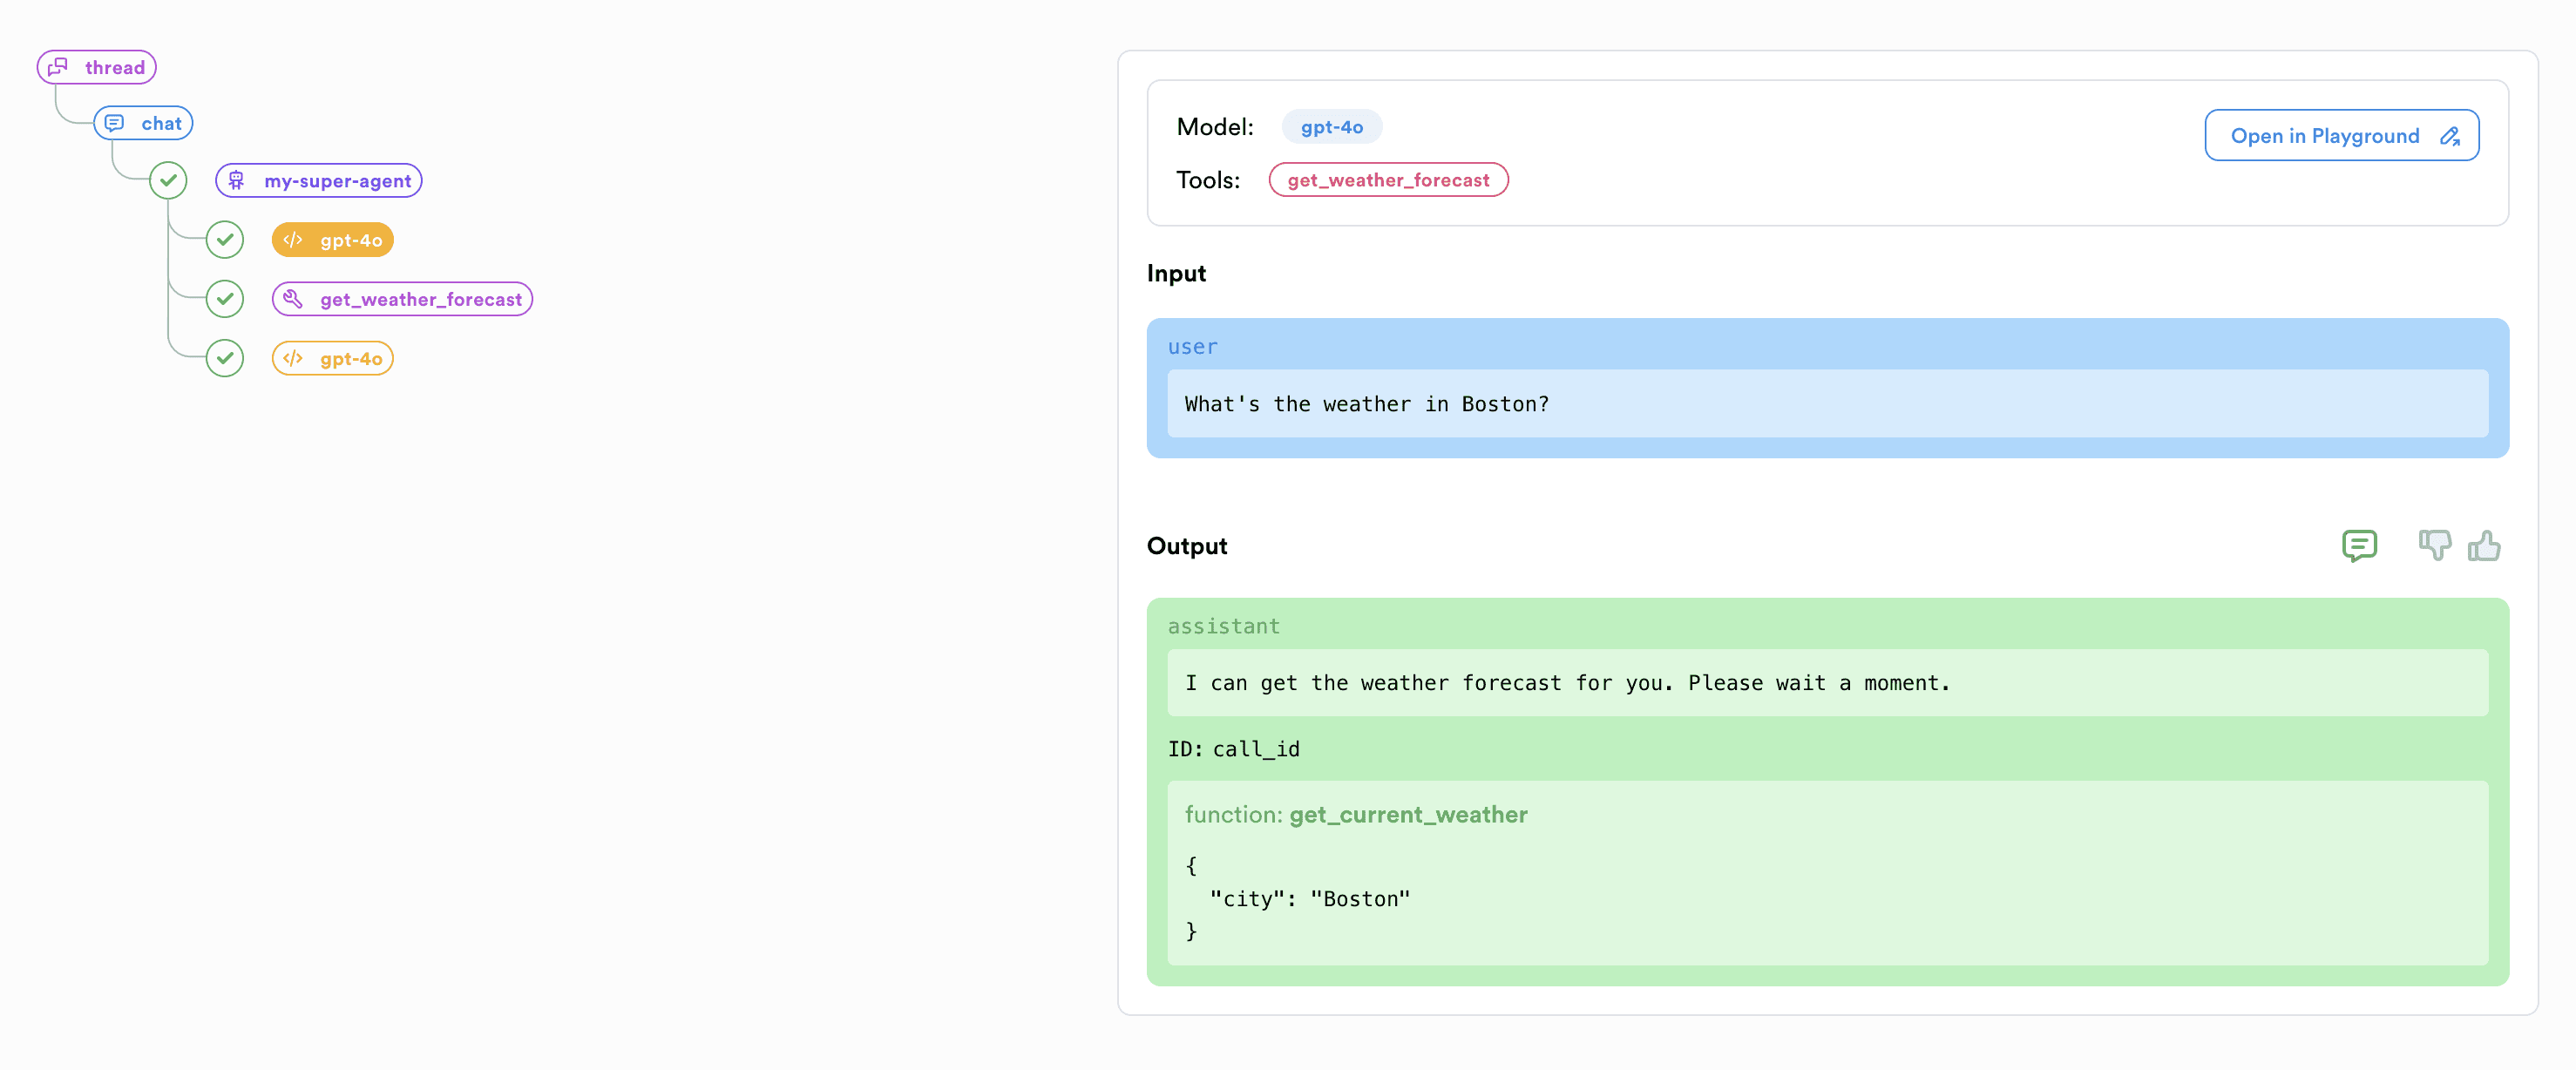
3. The agent makes an LLM call and asks a tool to be executed.
{"type": "llm","event": "start","runId": "llm-run-id","name": "gpt-4o","parentRunId": "agent-run-id","timestamp": "2024-07-16T00:00:02Z","params": {"tools": [{"type": "function","function": {"name": "get_weather_forecast","description": "Get the weather forecast for a specific location.","parameters": {"type": "object","properties": {"city": {"type": "string","description": "The city for which to get the weather forecast."}},"required": ["city"]}}}]},"input": [{"role": "user", "content": "What's the weather in Boston?"}]}
Assuming the LLM would respond with:
{"type": "llm","event": "end","runId": "llm-run-id","parentRunId": "agent-run-id","timestamp": "2024-07-16T00:00:05Z","output": {"role": "assistant","content": "I can get the weather forecast for you. Please wait a moment.","tool_calls": [{"id": "call_id","type": "function","function": {"name": "get_current_weather","arguments": "{\"city\": \"Boston\"}"}}]}}
3. We execute the tool.
{"type": "tool","event": "start","runId": "tool-run-id","parentRunId": "agent-run-id","timestamp": "2024-07-16T00:00:06Z","name": "get_weather_forecast","input": {"city": "Boston"}}
At this point we would call our weather API, and then respond with the output:
{"type": "tool","event": "end","runId": "tool-run-id","parentRunId": "agent-run-id","timestamp": "2024-07-16T00:00:10Z","output": {"temperature": 72,"weather": "sunny"}}
4. Another LLM call is made with the tool's output.
{"type": "llm","event": "start","runId": "llm-run-id-2","parentRunId": "agent-run-id","timestamp": "2024-07-16T00:00:11Z","name": "gpt-4o","input": [{ "role": "user", "content": "What's the weather in Boston?" },{ "role": "assistant", "content": "I can get the weather forecast for you. Please wait a moment.", "tool_calls": [{ "id": "call_id", "type": "function", "function": { "name": "get_current_weather", "arguments": "{\"city\": \"Boston\"}" }}]},{ "role": "tool", "content": "{\"temperature\": 72, \"weather\": \"sunny\"}" }]}
Let's assume the LLM would respond with:
{"type": "llm","event": "end","runId": "llm-run-id-2","timestamp": "2024-07-16T00:00:15Z","parentRunId": "agent-run-id","output": {"role": "assistant","content": "The weather in Boston is sunny with a temperature of 72 degrees."}}
5. The final answer is returned to the user.
We can first mark the agent run as completed.
{"type": "agent","event": "end","runId": "agent-run-id","timestamp": "2024-07-16T00:00:20Z","output": "The weather in Boston is sunny with a temperature of 72 degrees."}
Then reply the final answer to the user (note that the runId & parentRunId here is the same as the previous chat run), as 1 ID is used per user->assistant interaction.
{"type": "thread","event": "chat","runId": "chat-run-id","parentRunId": "thread-run-id","timestamp": "2024-07-16T00:00:25Z","message": {"role": "assistant","content": "The weather in Boston is sunny with a temperature of 72 degrees."}}
As you can see, in the context of:
- chat messages, the user message is passed with the
messagefield - llm calls,
inputis the prompt andoutputis the llm's response - tools,
inputis the arguments and theoutputis the tool's result
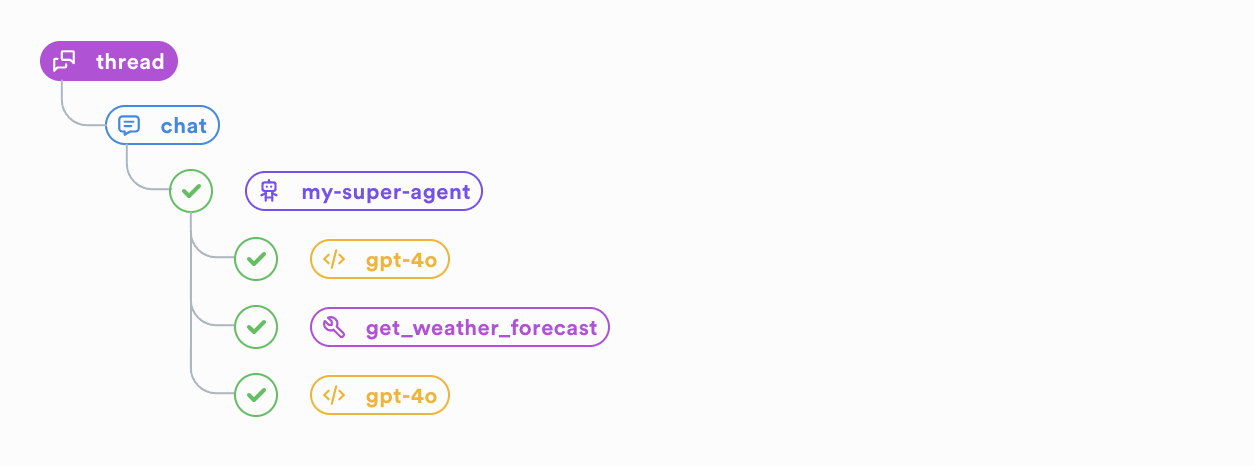
This is how it would look in the Lunary UI, under the Threads section:
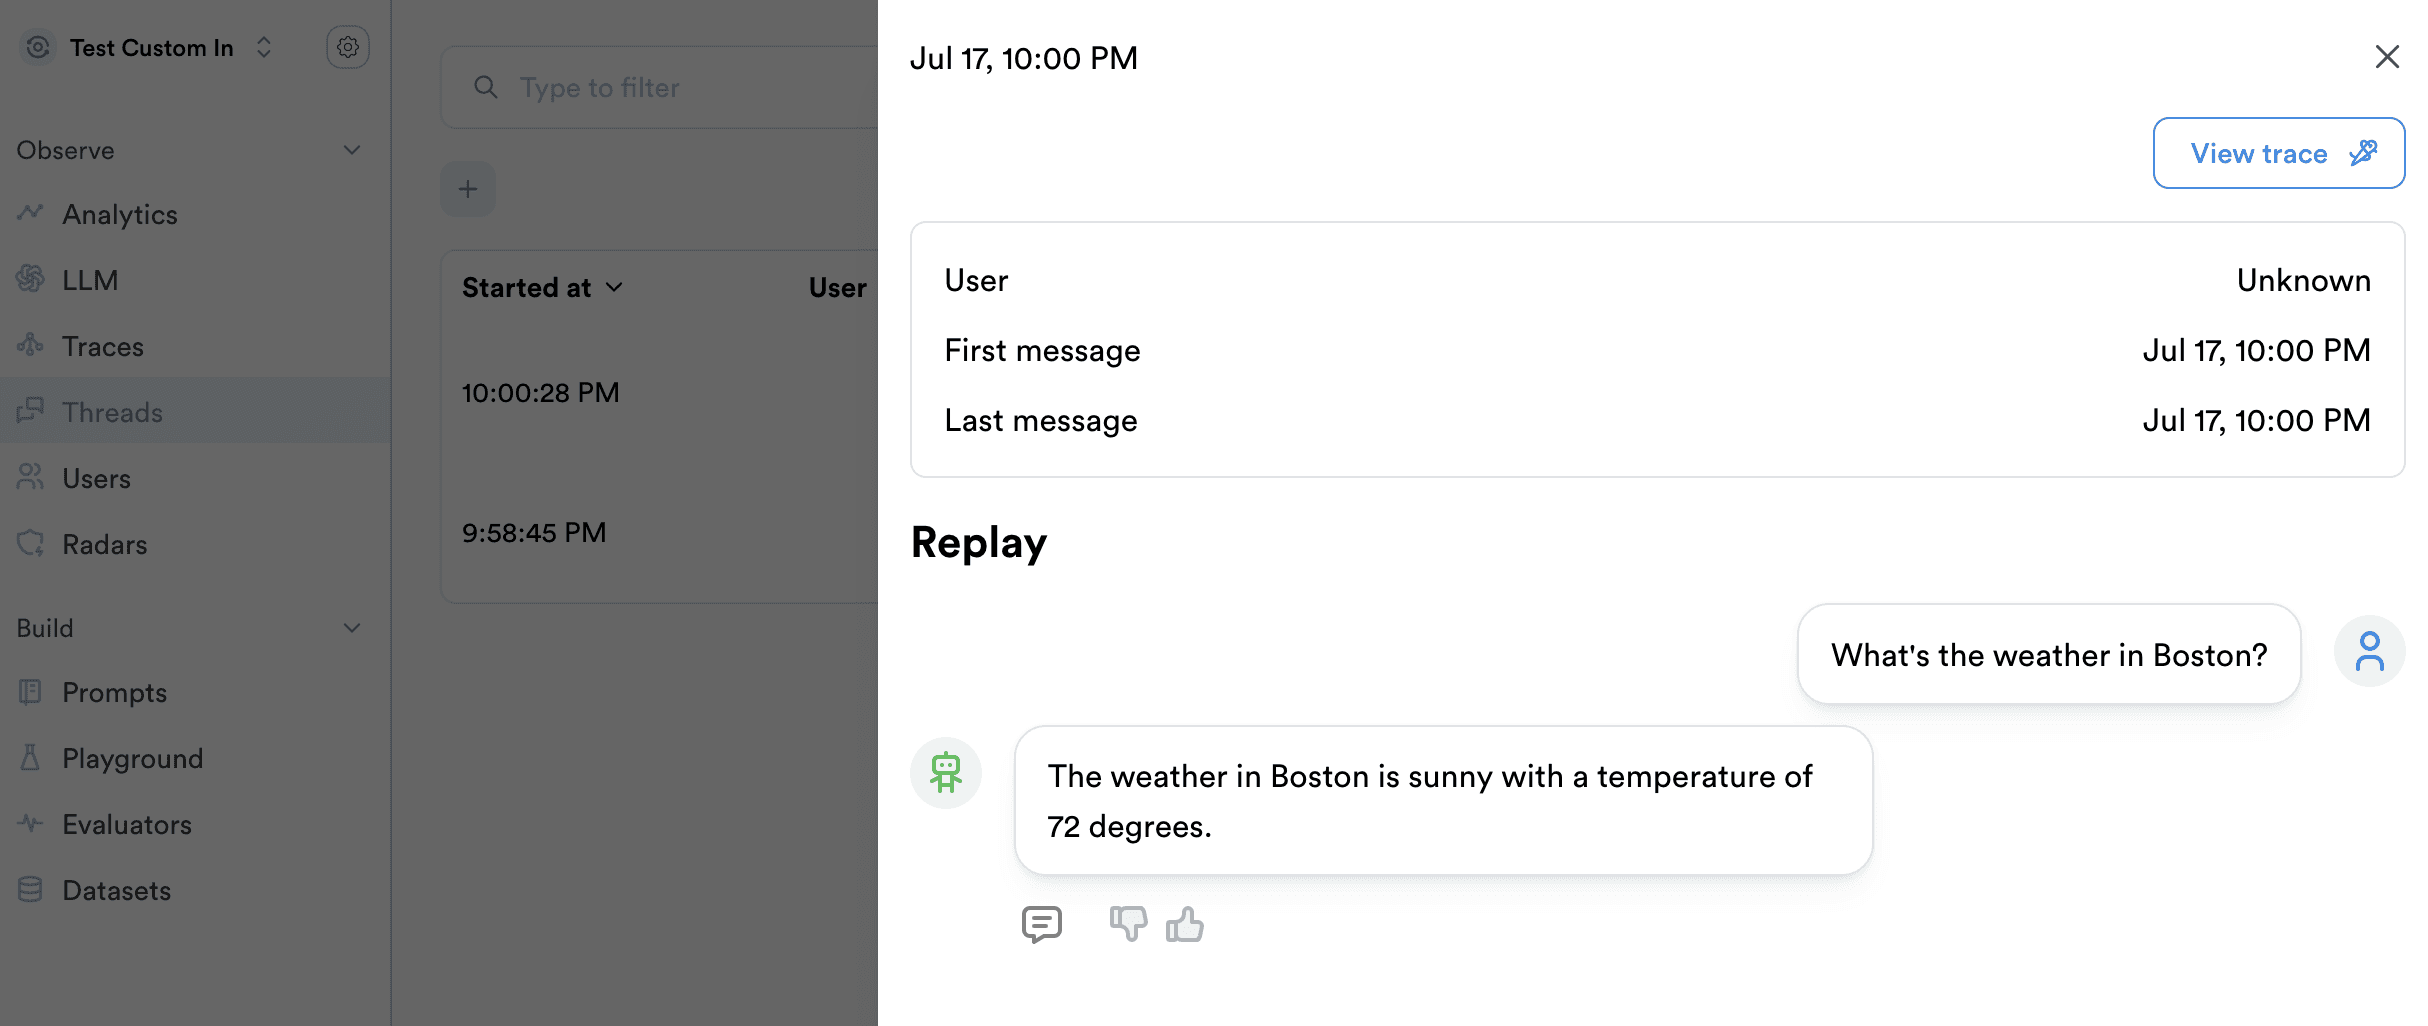
And clicking on "View trace" shows us:
Bonus: Reporting User Feedback
If you have feedback from the user, you can attach it to the chat run using a feedback event and the feedback field.
{"type": "chat","event": "feedback","runId": "chat-run-id","feedback": {"comment": "Great response!","thumb": "up"}}
The feedback will now cascade down to all the child runs within the UI, for easy filtering of positive and negative runs.